Build a Headless Checkout
In this tutorial, you will learn how to build a one-page, headless checkout that you can implement on your ecommerce store. This tutorial is based on a publicly-available example created by developers at Bold.
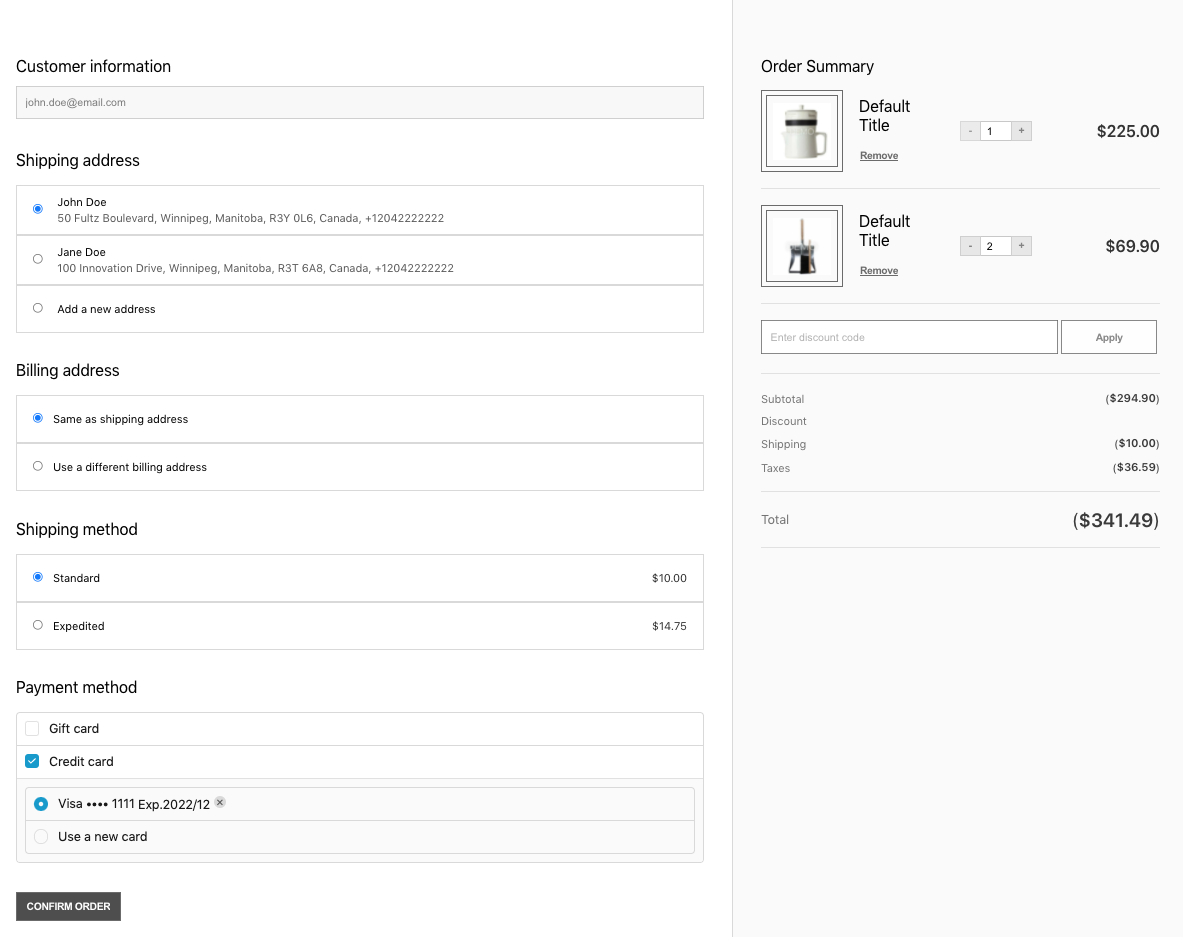
The following image shows an example of a single-page checkout user interface:
View the example on GitHub, or keep reading for step-by-step instructions on creating a checkout from scratch.
Architecture requirements
Creating a headless checkout experience with the Bold APIs requires the following technologies:
The Bold Checkout app, which enables you to use the Checkout Frontend API and Checkout Backend API.
An ecommerce platform, which provides product inventory management, maintains customer records, and hosts site pages. This example uses BigCommerce.
Various frontend technologies, which allow you to customize your users’ checkout experience and align user interface elements with your brand. This example uses React — specifically, the checkout-react-components library.
A backend application, which provides routing functionality, initializes orders via the Bold Checkout Backend API, and can host the checkout pages. This example uses Node.js and Express as the framework for the backend application.
noteThe backend application is used to call the Checkout Backend API. This API requires tokens with special privileges that are not safe to share publicly, so it is important to make these calls from a controlled environment.
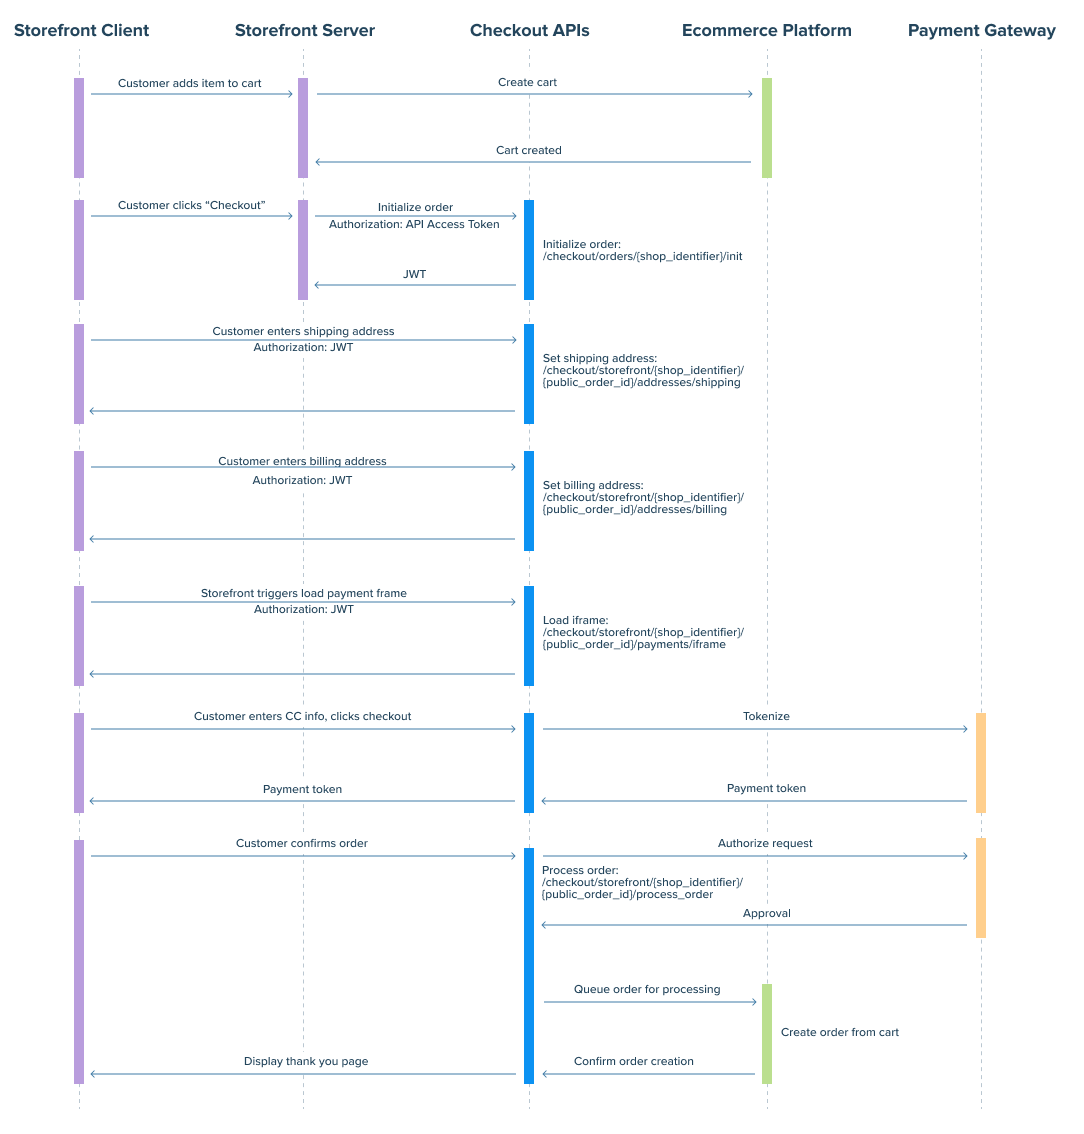
The following diagram shows how each of these technologies work together to create a headless checkout experience:
Prerequisites
Before you get started, complete the following steps:
- Complete the instructions in the Checkout Getting Started guide.
- Make sure you can serve your custom checkout application a publicly-accessible URL with a unique domain name. Bold requires a publicly-accessible URL to verify the security of customer information when using the Bold APIs.
- You can use tools such as NGROK or Cloudflare Tunnels to create a public domain for your local host.
- When complete, reach out to the Bold Commerce Partners team to add your store’s domain to the list of stores using the Checkout Storefront APIs.
Project setup
Complete the following steps to set up your project.
Create environment variables
On the Checkout Getting Started guide, you retrieved both an API access token and the shop identifier of your store. Both of these are used frequently for Bold API calls, so it is helpful to store them in your app as environment variables.
In your repository, create a .env file that contains the following text, and replace the variables with your information:
SHOP_IDENTIFIER={shop_identifier}
ACCESS_TOKEN={api_access_token}
Create and initialize a server
This example uses Express as a backend server and Handlebars.js, a Node.js templating engine. Handlebars.js is used to inject JavaScript variables into the HTML, which are consumed by React.
In your repository, create a file in which to initialize the server. The following snippet shows an example:
require("dotenv").config();
const fetch = require("node-fetch");
const express = require("express");
const handlebars = require("express-handlebars");

const app = express();
app.engine("handlebars", handlebars());
app.set("view engine", "handlebars");
app.set("views", "./server/views");
app.use(express.static("public"));
const port = 3000;

app.listen(port, () => {
  console.log(`Example app listening at http://localhost:${port}`);
});
Install the React component library
To install the Bold Commerce checkout-react-components library, run the following command in your CLI:
Using npm:
$ npm install @boldcommerce/headless-checkout-react --save
Or using yarn:
$ yarn add @boldcommerce/headless-checkout-react
Familiarize yourself with the components and hooks in the library — these will form the basis of the customers’ checkout experience. Of note are the following components:
CheckoutProvider, which provides the application state, initial data, store identifier, JSON web token, and public order ID to the checkout app.PaymentIFrame, which displays the PIGI<iframe>. Refer to the Payment Interface section for more information about PIGI.
Initialize the Bold Checkout order
When a customer clicks “Buy now”, “Checkout”, or another action that triggers the creation of a checkout page, the following steps are executed within the backend application:
- Receive cart information from the ecommerce platform.
- Authenticate the user.
- Use the Bold Checkout Backend API to initialize an order.
- Return the cart state to the frontend application in order to render the checkout.
These steps must be completed in your backend application because the Initialize Order endpoint returns information that is not safe to share with the frontend, so it is important to make these calls from a controlled environment.
To begin, define an Express route in the same file you created in the Create and initialize a server step. The following snippet shows an example of defining this route and outlines the actions that must be completed within it.
app.post("/", async (req, res) => {
  // Load dynamic cart data
  // Authenticate users
  // Call the Initialize order endpoint
  // Render the checkout
});
The following sections contain instructions for completing each of these actions.
Load dynamic cart data
The Initialize Order endpoint allows you to provide cart data through the cart_items object. This object can be left empty, hard-coded, or populated with dynamic data.
The Single Page Checkout example simply adds a hard-coded item to the checkout order, as shown in the following example:
const body = {
  cart_items: [
    {
      sku: "ABS",
      quantity: 1,
      line_item_key: "abc123",
    },
  ],
};
You could also retrieve dynamic data from the request. The methods for doing so vary between platforms. You can retrieve a cart object or cart ID from your platform, which would both allow you to populate the request body with the current customer's cart contents.
Authenticate users
If your store allows customers to log in to previously-created accounts, your backend application should verify that the customer checking out is who they say they are.
The Initialize Order endpoint can accept a customer object in the request body. If the customer is logged in, use your platform's functionality to identify the customer checking out and verify that this user is registered within your app. You can then use information from your platform, such as the platform_id of the customer, to construct a customer object and pass it to the Initialize order endpoint.
For example, BigCommerce provides a Get Current Customer endpoint, which returns a JWT that is signed with your API access token. You can pass the JWT to your backend application and verify that it matches your platform JWT and determine the customer ID.
If you determine that the customer is not logged in, you can treat the checkout as a guest checkout and omit the customer object from the Initialize order request body.
Call the Initialize order endpoint
When you have retrieved the cart items and verified the identity of the customer, call the Initialize Order endpoint of the Checkout Backend API to begin the checkout process.
Create a checkout variable that calls the Initialize Order endpoint and provides it with the appropriate information. The following snippet shows an example of this API call:
const checkout = await fetch(`https://api.boldcommerce.com/checkout/orders/${process.env.SHOP_IDENTIFIER}/init`, {
  headers: {
    Authorization: `Bearer ${process.env.ACCESS_TOKEN}`,
    "Content-Type": "application/json",
  },
  method: "POST",
  body: JSON.stringify(body),
});
The JSON response to this call contains important information about the new order, including:
initial_data— a set of data about the store the order was created on.application_state— all of the information that Bold Checkout has about the order. If no initial data was provided, all values will be empty.jwt_token— a JSON Web Token (JWT) that authenticates the user’s checkout session.noteThe
jwt_tokenmust be used in theAuthentication: Bearerheader for all calls to the Checkout Frontend API. This token is valid for 60 minutes, after which it must be refreshed using the Refresh JWT endpoint.public_order_id— a string used to keep track of the order and refresh the JWT if necessary
Render the checkout
After you call the Initialize order endpoint, you can display the checkout page to the customer. The following snippet shows one way to wait for the API response, extract the necessary information about the checkout, and pass it to your React app:
  const response = await checkout.json();

  const {
    initial_data, application_state, jwt_token, public_order_id,
  } = response.data;

  res.render('checkout_example', {
    layout: false,
    publicOrderId: public_order_id,
    jwtToken: jwt_token,
    storeIdentifier: process.env.SHOP_IDENTIFIER,
    applicationState: JSON.stringify(application_state),
    initialData: JSON.stringify(initial_data),
  });
});
Populate the order
The actions the customer takes on the checkout page trigger calls to the Checkout Frontend API, which adds, changes, or deletes data about the order. The Populate an order page outlines the recommended sequence in which to call these endpoints and update an order.
The single-page checkout example created by Bold uses React components to call these endpoints. Find more details about this approach in the Create a React app section, which demonstrates how to use the checkout-react-components library instead of making frontend components from scratch.
Create a React app
In your repository, create a file named App.jsx that instantiates your React app. This file should import React, the Bold CSS, the CheckoutProvider component, and the PaymentIFrame component.
The following snippet shows an example of the App.jsx file used in the Single Page Checkout example:
import React from "react";
import { CheckoutProvider } from "@boldcommerce/checkout-react-components";

const App = () => {
  return (
    <CheckoutProvider
      applicationState={window.checkout.applicationState}
      initialData={window.checkout.initialData}
      publicOrderId={window.checkout.publicOrderId}
      token={window.checkout.jwtToken}
      storeIdentifier={window.checkout.storeIdentifier}
    >
      <PaymentIFrame />
    </CheckoutProvider>
  );
};

export default App;
When you create an order using the Initialize Order endpoint, the API returns the details of the customer’s order. Pass these details from the server to the CheckoutProvider component as properties, as shown in the Render the checkout step.
Add custom components
You can use the hooks from the checkout-react-components library to create your own components that call the Checkout Frontend API.
For example, you could create a Customer component, which uses the useCustomer hook, to allow the user to add their email to the order. The following snippet shows an example of a custom Customer component:
import React from "react";
import { useCustomer } from "@boldcommerce/checkout-react-components";

const Customer = () => {
  const { data, submitCustomer } = useCustomer();
  const [loading, setLoading] = useState(false);
  const [errors, setErrors] = useState(null);

  const handleSubmit = async () => {
    setLoading(true);
    try {
      await submitCustomer({
        email_address: "john.doe@email.com",
      });
      setErrors(null);
    } catch (e) {
      setErrors(e.body.errors);
    }
    setLoading(false);
  };

  return (
    <div>
      {errors && <p>{errors[0].message}</p>}
      <label htmlFor="email">Email</label>
      <input type="email" id="email" value={data.email_address} />
      <button type="button" onClick={handleSubmit} disabled={loading}>
        Submit
      </button>
    </div>
  );
};

export default Customer;
After creating your own custom component, display it on the checkout page by adding it within the CheckoutProvider component in the App.jsx file. The following snippet shows an example of how you might edit this file to include the Customer component:
<CheckoutProvider {...props}>
  <PaymentIFrame />
  <Customer />
</CheckoutProvider>
Set up PIGI
Bold uses a Payment Isolation Gateway Interface (PIGI) system to render payment gateways (such as Stripe or Braintree) on the page and allow customers to input their information. It loads an <iframe> with available payment options. You can post and receive messages to and from PIGI. For more information about PIGI, refer to the Payment Isolation Gateway Interface page.
The PaymentIFrame React component initializes the <iframe>, sends actions to PIGI, and receives responses back from PIGI in order to provide a dynamic checkout payment interface. For more information about the actions and responses available, refer to the PIGI API Reference.
Render the app
Create a file that will render your React app upon page load.
The following snippet contains an example of the contents of this file:
import React from "react";
import ReactDOM from "react-dom";
import App from "./App";

ReactDOM.render(<App />, document.getElementById("checkout-app"));
Next steps
Continue to customize the frontend of your application using your own React components and other technologies.
If you have trouble completing these steps or would like additional guidance from Bold, please reach out to the Partners Team.